
While product designers focus on the aesthetics and initial feel of motion control components, field technicians, maintenance crews, and assembly line workers deal with the practical realities: installation, adjustment, and long-term maintenance.
A high-quality rotary damper or friction hinge is only as good as its installation. Improper mounting can lead to premature failure, while incorrect torque adjustments can frustrate end-users.
This technical guide, developed by the engineering support team at Janhinge, provides actionable insights into damper hinge installation, troubleshooting, and the critical role of rotary damper silicone oil in maintaining optimal performance.
1. The Life blood of Motion Control: Rotary Damper Silicone Oil
Before discussing installation, it is crucial to understand what makes a rotary damper work. The resistance (damping force) is generated by a rotor shearing through a highly viscous fluid. In almost all premium dampers, this fluid is silicone oil.
1.1 Why Silicone Oil?
Rotary damper silicone oil is chosen over standard mineral oils for three primary reasons:
1.Chemical Stability: It does not degrade or oxidize easily over time, ensuring a long lifecycle.
2.Material Compatibility: It does not react with or degrade the engineering plastics (like POM or PC) used for the damper housing.
3.Viscosity Index: It maintains a relatively stable viscosity across a wide temperature range.
1.2 Viscosity Grade Selection
The torque of a damper is directly proportional to the viscosity of the silicone oil inside it. Viscosity is measured in centistokes (cSt).
If a technician replaces a damper on a heavy industrial lid with one containing low-viscosity oil (e.g., 10,000 cSt), the lid will slam. Conversely, using high-viscosity oil (e.g., 1,000,000 cSt) on a lightweight toilet seat will cause the seat to stall and never fully close. When ordering OEM replacements, matching the exact viscosity grade is paramount.
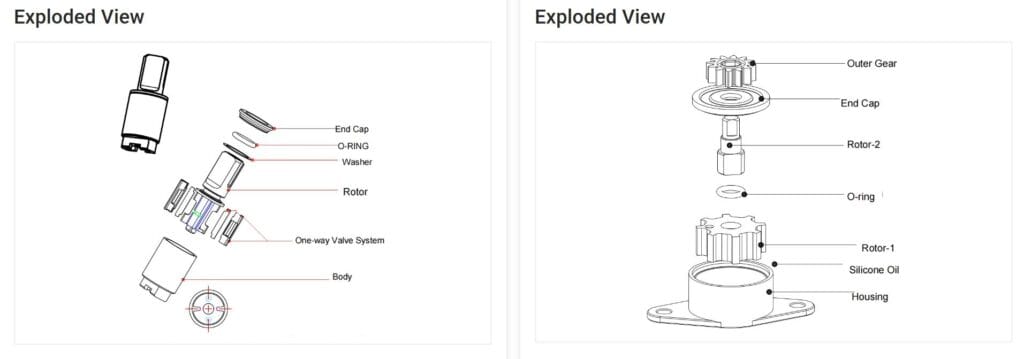
Figure 1: Different types of rotary dampers require specific silicone oil viscosities to achieve their rated torque.
2. Best Practices for Damper Hinge Installation
Improper damper hinge installation is the leading cause of premature failure. Even the most robust damper will leak or break if subjected to forces it was not designed to handle.
2.1 Alignment and Coaxiality
The most critical rule of installation is maintaining strict coaxiality. The rotational axis of the damper must perfectly align with the rotational axis of the door or lid.
If the damper is mounted slightly off-center, it introduces a “radial load” (side-loading) onto the damper shaft. Rotary dampers are designed to handle rotational torque, not side-to-side pressure. Radial loading will quickly wear down the internal O-ring seal, leading to catastrophic silicone oil leakage.
2.2 Avoiding Thrust Loads
Similarly, technicians must ensure no “thrust load” (pushing or pulling along the axis of the shaft) is applied during installation or operation. Forcing a gear onto a damper shaft with a hammer, for example, can rupture the internal housing.

Figure 2: Proper alignment during soft close hinge installation is critical to prevent radial loading and premature failure.
3. Friction Hinge Torque Adjustment
While rotary dampers control speed, friction hinges (position hinges) control the holding angle. In many industrial and ergonomic applications, the holding force needs to be fine-tuned after installation.
3.1 The Adjustment Mechanism
Many heavy-duty friction hinges feature a friction hinge torque adjustment screw. This screw tightens or loosens the internal friction bands (or compresses the friction disks) against the central shaft.
•Tightening: Increases the holding torque, allowing the hinge to support a heavier monitor or lid.
•Loosening: Decreases the holding torque, making it easier for the user to adjust the angle.
3.2 The Danger of Over-Tightening
Technicians must use caution during adjustment. Over-tightening the adjustment screw can cause the friction bands to bind or gall against the shaft. This leads to a “jerky” or “sticky” motion rather than a smooth, premium feel, and drastically reduces the lifecycle of the hinge. Always adjust in small increments and test the motion.
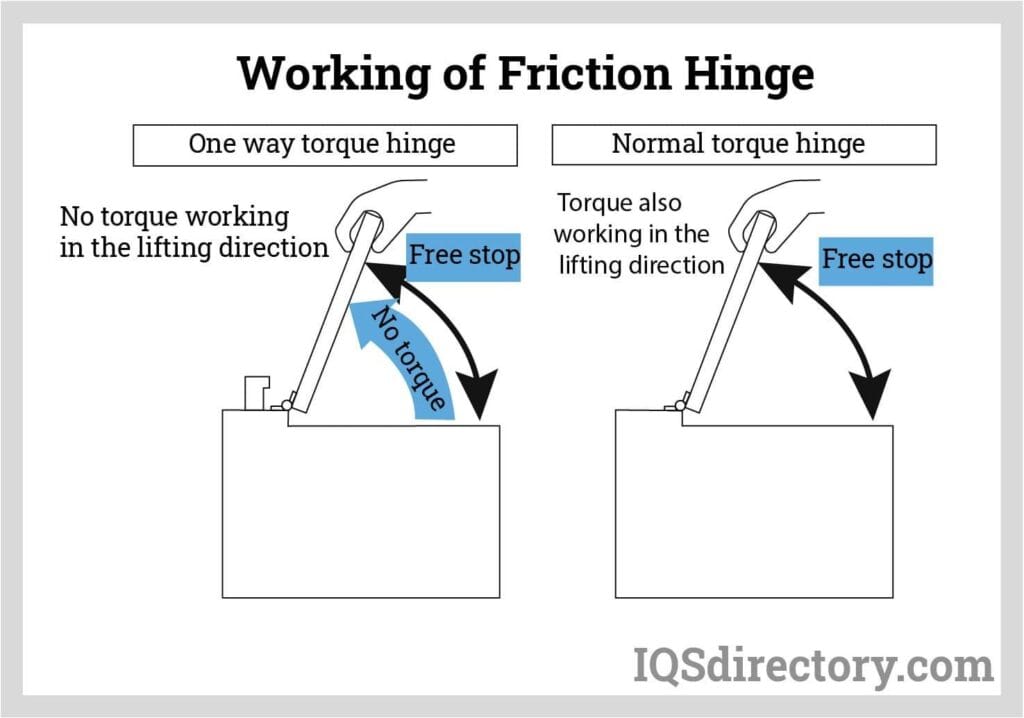
Figure 3: The internal mechanics of a friction hinge, illustrating how torque is generated and adjusted.
4. Troubleshooting and Soft Close Hinge Replacement
When a soft-close mechanism fails in the field, technicians must diagnose the root cause before attempting a damper hinge repair or replacement.
4.1 Diagnosing the Failure
•Symptom: The door slams shut.
•Cause: The damper has lost its fluid resistance. This is usually due to a ruptured seal and leaked silicone oil, or the internal plastic vanes have broken due to excessive force.
•Solution: The damper cartridge or the entire hinge must be replaced.
•Symptom: The door closes too slowly or stops halfway.
•Cause: The hinge may be misaligned, causing binding. Alternatively, the ambient temperature may be extremely cold, thickening the silicone oil.
•Solution: Check alignment and adjust the 3D mounting screws. If temperature is the issue, a damper with a different oil viscosity may be required.
•Symptom: The door bounces back slightly after closing.
•Cause: The damper torque is too high for the weight of the door, acting as a spring rather than a shock absorber.
•Solution: Replace with a lower-torque damper.
4.2 Soft Close Hinge Replacement
When performing a soft close hinge replacement on cabinetry or furniture, modern 3D adjustable hinges make the process straightforward.
After securing the mounting plate and clipping on the new hinge, technicians use the three adjustment screws to align the door:
1.Depth Adjustment: Moves the door closer to or further from the cabinet box.
2.Side Adjustment: Moves the door left or right to ensure even gaps between doors.
3.Height Adjustment: Moves the door up or down to align with adjacent doors.
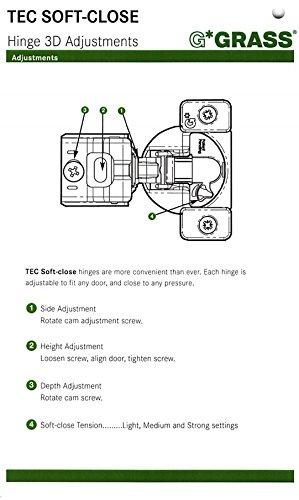
Figure 4: Modern soft-close cabinet hinges feature 3D adjustment screws for perfect door alignment after replacement.
5. Conclusion
Proper installation and maintenance are just as critical as the initial engineering of a motion control component. By understanding the role of silicone oil, the importance of coaxial alignment, and the proper techniques for torque adjustment, technicians can ensure that products deliver a flawless user experience for years to come.
For OEM manufacturers looking for reliable, easy-to-install motion control solutions, contact the Janhinge engineering team today. We provide comprehensive installation guidelines and technical support for all our rotary dampers and friction hinges.
6. Frequently Asked Questions (FAQ)
Q1: Can I refill the silicone oil in a rotary damper if it leaks?
A: No. Damper hinge repair by refilling oil is not possible in the field. Rotary dampers are hermetically sealed (usually via ultrasonic welding) at the factory with a precise, milligram-accurate volume of oil. If a damper leaks, the seal is broken, and the entire unit must be replaced.
Q2: Why does my soft-close cabinet door suddenly slam shut after years of working fine?
A: This indicates that the internal hydraulic cylinder or rotary damper has failed. The constant stress over thousands of cycles eventually wears out the internal O-ring seal, allowing the silicone oil or hydraulic gas to escape, eliminating the damping resistance. A soft close hinge replacement is required.
Q3: How do I know how much to adjust the torque on a friction hinge?
A: Friction hinge torque adjustment should be done incrementally. Turn the adjustment screw a quarter-turn at a time, then test the movement of the lid or monitor. The goal is to find the “sweet spot” where the lid holds its position securely against gravity but can still be moved smoothly by the user without excessive force.
Q4: Does the orientation of the rotary damper matter during installation?
A: For continuous rotation gear dampers, orientation usually does not matter. However, for limited-angle vane dampers (like those used in toilet seats or heavy lids), orientation is critical. They have a specific starting and stopping point. Installing them backward will result in zero damping force when closing and extreme resistance when opening.
Q5: What is the difference between a 3D adjustable hinge and a standard hinge?
A: A 3D adjustable hinge features three distinct screws on the hinge arm that allow a technician to move the attached door up/down, left/right, and in/out without having to unscrew the hinge from the cabinet wall. This makes aligning doors during installation or replacement incredibly fast and precise.